My Polycom Phone Won’t Boot/Application Not Present Error
If you are having boot problems with your Polycom phone, follow these steps.
Step 1: Connect to the Polycom Public Provisioning Server.
- Obtain your phone’s administrator password.
What is the administrator password for my phone?
If your phone or adapter is running on UC4.0 firmware or later (Polycom), you will not be able to use the manufacturer’s default password to access the administrator settings of your phone.Default Password for non-UC4.0+ Firmware:
– 456
– MAC Password - Reboot the phone by pressing the Home/Menu button and select Settings > Basic > Restart.
- While the phone is booting up, press the “Setup” soft key. It may take a moment for the key to appear.
- Enter your phone’s password then press “OK“.
- Scroll down to and select “Server Menu“.
- On Server Type press “Edit“.
- Scroll the left arrow key until “HTTP” is selected then press “OK“.
- On Server Address, press “Edit“.
- Enter the appropriate server address for your phone model.
– SoundPoint IP models: voip2.polycom.com/4010
– VVX models: voip2.polycom.com/545 - Expand DHCP Menu, change Boot Server to Static.
- Press OK.
- Press Exit twice (IP 335 users: Left arrow key), then Save & Reboot.
- The phone will reboot twice and update to BootROM version 4.0.4.
Step 2: Upgrade or Downgrade Polycom Firmware
- In the phone’s local menu’s, select Menu/Home → Settings → Advanced (Pass is 456) → Administration Settings → Network Configuration.
- Adjust DHCP as follows:
– On a 3.x firmware Phone: Main Menu → Settings → Advanced → Admin Settings → Network Configuration → DHCP Menu.
– On a 4.x/5.x firmware Phone: Main Menu → Settings → Advanced → Admin Settings → Network Configuration → Provisioning Server → DHCP Menu.
– Set the Boot Server as: Static
– Set the BootSrv Type to: IP Address - From the Provisioning Server menu set the server type as HTTP.
- Change the Server Address to: voipt2.polycom.com/XXX or 140.242.64.35/XXX
a. Where “XXX” is the firmware version you are upgrading or downgrading to.Upgrade Example: voipt2.polycom.com/520 OR 140.242.64.36/520
Downgrade Example: voipt2.polycom.com/dg OR 140.242.64.35/dg
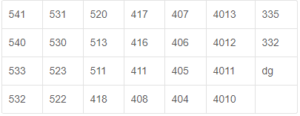
b. Available Firmware versions include:
Notes
The 1/A/a button on the phone changes the input type. The leftmost character is the current input type. For example, 1/A/a would be entering numbers where as A/a/1 would be input in upper case letters.
After you have entered the correct server address and firmware version, be sure to exit the menus until you are prompted to save and reboot.
The phone may reboot a couple of times and present various statuses as it is downgrading or upgrading the firmware configuration.
After upgrading or downgrading the phones firmware from the publicly available Polycom firmware server, you will need to set the Boot Server back to Custom+Opt.66 and the BootSrv Type back to String as well as ensure the phone is properly configured for your PBX.

If you have any additional questions about your Polycom phones from RingSquared, please contact the RingSquared support team or call 800-427-Ring.
Connecting a new IP phone? This guide walks you through setting up your new phone and connecting it to RingSquared.